How To Create A POS Restaurant Menu
1. Introduction
This document serves as a detailed guide for creating a new POS Restaurant Menu.
2. Creating a Menu Template for Data Extraction
This guide provides instructions on creating a structured spreadsheet template for extracting and organizing menu data provided by restaurants. The template is designed to standardize the data collection process, ensuring consistency and completeness. The following sections outline the steps and components of the template.
2.1 Create a New Spreadsheet
- Open your preferred spreadsheet application (e.g., Microsoft Excel, Google Sheets).
- Create a new spreadsheet and name it appropriately, such as "Restaurant Menu Data" or "Setup".
2.2 Column Headers
-
In the first row, create the following column headers to capture the necessary information:
- Category
- Sub-Category
- Item Name
- Description
- Choices
- Add-Ons
- Price
- Notes
- Status
3. Template Layout
- Refer to the image below for a visual representation of the template to better understand its layout.
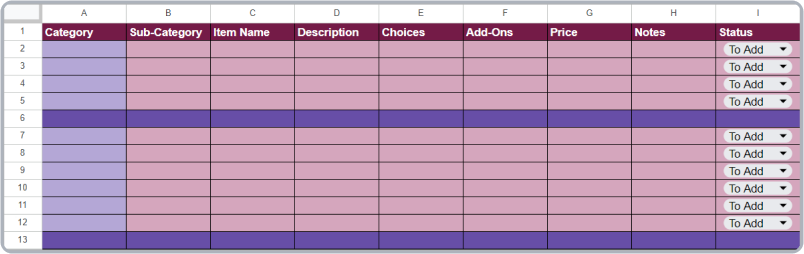
3.1 Category and Sub-Category
- Use the Category column to specify the main groupings of menu items, such as Desserts, Beverages, or Snacks.
- The Sub-Category column is for further classification under each main category. For example, under Desserts, you might list Ice Creams, Mousse, or Cheesecakes.
3.2 Item Details
- The Item Name column should include the name of the menu item.
- The Description column should provide a brief explanation of the item, such as key ingredients or flavor profiles.
3.3 Choices and Add-Ons
- The Choices column is for listing any available options for the item, such as different sizes, flavors, or preparation methods.
- The Add-Ons column should be used to specify extra toppings or side items that can be added to the dish.
3.4 Pricing
- In the Price column, enter the cost of the menu item. Some items may have a base price of $0.00, with final prices determined by choices.
3.5 Additional Notes
- The Notes column is for any special instructions.
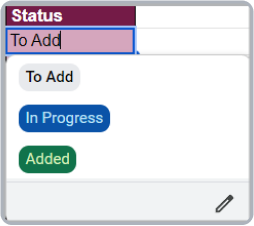
3.6 Status
-
The Status column is used to track the progress of each item with a dropdown menu that includes the following options:
- To Add
- In Progress
- Completed
4. Subsections for Add-Ons and Choices
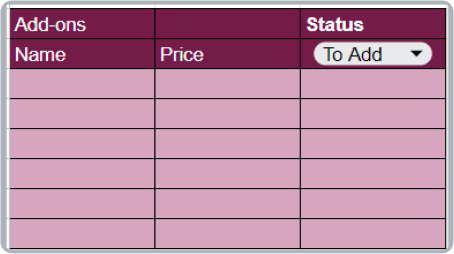
4.1 Add-Ons Group
-
Create a section in the spreadsheet for listing add-ons available for various menu items. Use the following columns:
- Name: The name of the add-on (e.g., extra cheese, bacon).
- Price: The price of the add-on.
- Status: Track the progress of adding the add-on with statuses like "To Add", "In Progress", or "Completed".
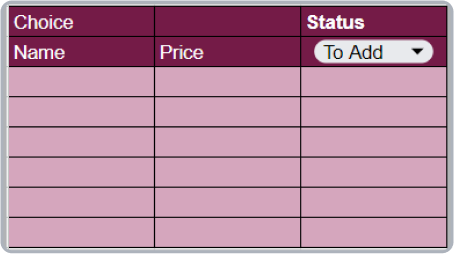
4.2 Choice Groups
-
Create a separate section for choice options (e.g., sizes, flavors). Include the following columns:
- Choice: The name of the choice (e.g., small, medium, large).
- Price: The price associated with the choice (if applicable).
- Status: Track the progress of adding choices with statuses like "To Add", "In Progress", or "Completed".
5. Adding the Items
To begin adding items, log in to the Backoffice using your account credentials. Once logged in, navigate to the Menu section, and then click on Categories to start adding the categories.

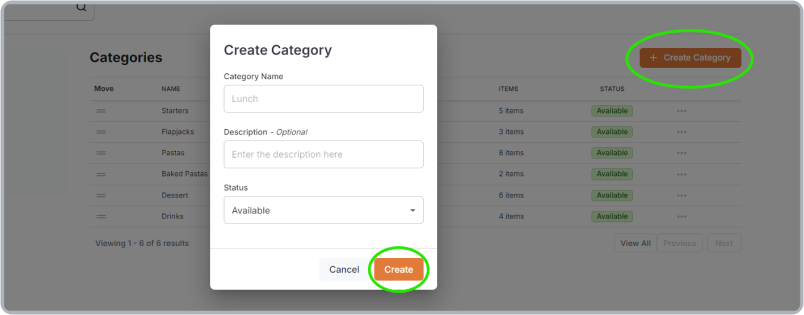
5.1 Categories
- Click the Create Category button.
- Enter the Category Name.
- The Description field is optional and can be skipped if not required.
- Ensure the Status is set to Available so it shows up in the POS system.
- Press the Create button to finalize.
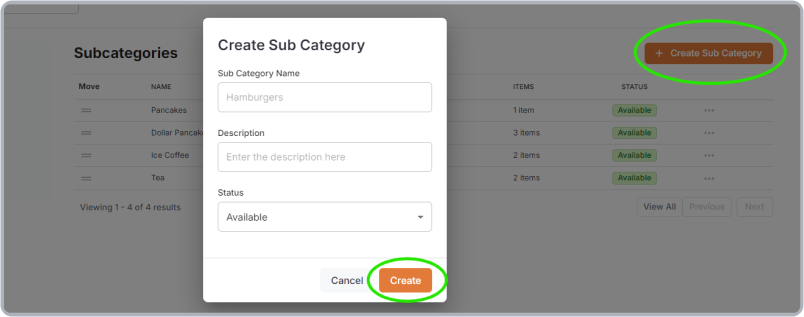
5.2 Sub-categories
- Navigate to the Subcategories section.
- Click the Create Subcategory button.
- Enter the Subcategory Name.
- The Description is optional and can be skipped if not required.
- Ensure the Status is set to Available so it shows up in the POS system.
- Press the Create button.
5.3 Modifiers (Choices / Add-Ons)
- Choices: Defines optional variations for menu items (e.g., sizes or flavors), with settings for visibility, requirement, and limits.
- Add-Ons: Lists additional items that can be paired with menu items (e.g., extra toppings), with settings for visibility and quantity limits.
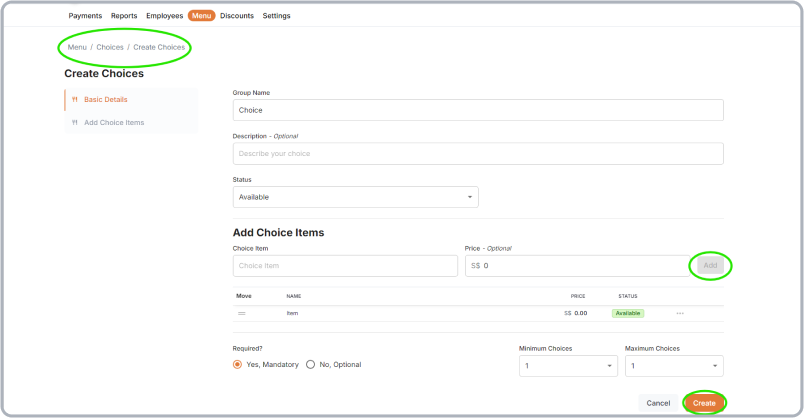
5.3.1 Choices
- Navigate to the Choices section under Modifiers.
- Click the Create Choices button.
- Enter the Choice Group Name.
- The Description field is optional.
- Set the Status to Available to ensure the choice is visible.
- Enter the Item Name and Price in the respective fields.
- Click the Add button after each choice item, repeating the process for all choices.
- Added items will appear in a table below.
- Set the choice as Required or Optional.
- Select the Minimum and Maximum number of choices from the dropdown.
- Press the Create button to save the choices.
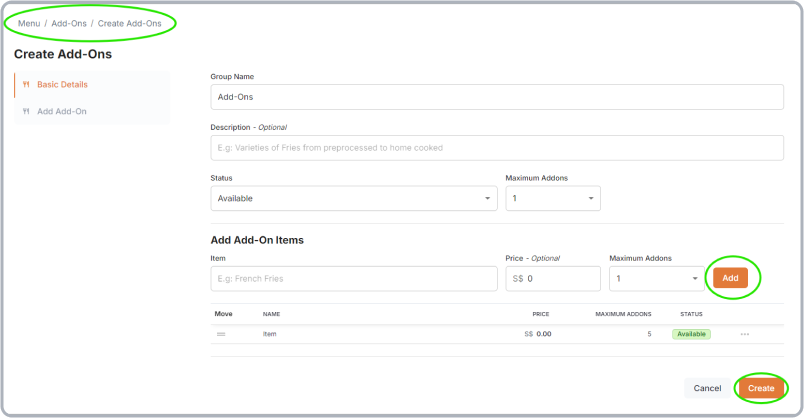
5.3.2 Add-Ons
- Go to the Add-ons section under Modifiers.
- Click the Create Add-ons button.
- Enter the Add-on Group Name.
- The Description is optional.
- Set the Status to Available so the group is visible.
- Enter the Add-on Item Name and Price.
- Select the Maximum number of Add-ons per item.
- Click the Add button after each add-on item, repeating the process.
- Set the Maximum Add-on Limit using the dropdown at the top of the add-ons section.
- Once all items are added, click the Create button to finalize.
5.4 Adding the Items
Note: Items should be added after all Categories, Sub-categories, and Modifiers have been created.
-
Navigate to the Items section.
-
Click the Create Item button.
-
Enter the Item Name.
-
Select the Category and Subcategory if applicable.
-
The Description field is optional.
-
Set the Status to Available.
-
Fill in the Price using the menu data.
- Note: Some items may have a price of $0 if the price is based on choices.
- Refer to the menu data extraction process if unsure.

5.4.1 Choices
- The created choices will appear in a list.
- Enable the switch for specific items that need choices to be active.

5.4.2 Add-ons
- The created add-ons will appear in a list.
- Enable the switch for specific items that need add-ons to be active.

5.4.3 Receipt Notes
- This section is optional and can be skipped.
5.4.4 Item Image
- Upload the image of the item by dragging and dropping it into the designated section or by simply selecting the file, however this section can be skipped as it is optional.
6. Final Step
- Finally, click the Create button once all required information is filled out.